Monday, September 24, 2012

Bear in the Backyard!

I thought I should share this morning's excitement.  We had a bear visitor for most of the morning.  Michael and I saw it in the trash around midnight last night and I guess it liked it so much it came back today.  This is the most I've gotten to see bears around camp and I'm glad the girls got to see it too.  It is really exciting and a bit nerve wrecking too.


I hope you enjoyed our black bear excitement!

Monday, September 17, 2012

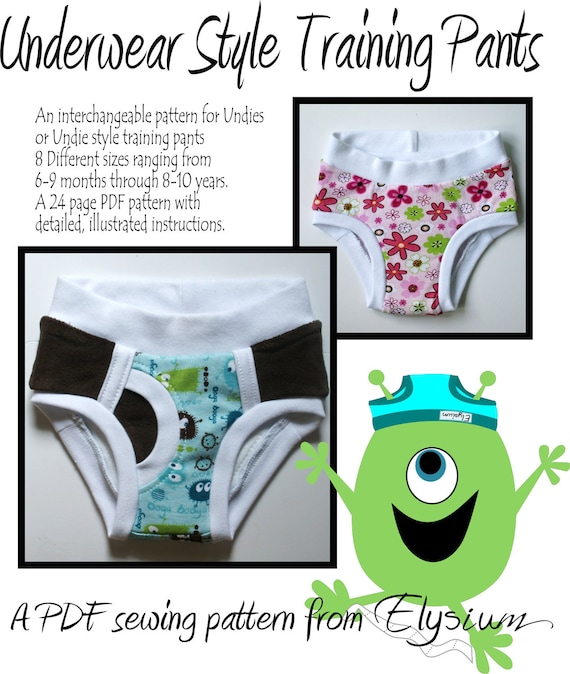
Elysium Pattern Underwear Style Training Pants

Recently, I bought a pattern in preparation for potty training (again).  We've tried Pull-ups and hated them.  We've tried panties only 3 day methods and had a huge breakdown.  So now that the girls are having tantrums wanting to use the potty, we are going to try again.  I wanted to try training pants so that it is a little less stressful than just panties and less messy, but it had to be reusable and inexpensive. I searched for hours upon hours for a free pattern online that I liked the look of and that I thought would meet my needs.  I gave up on that.  Finally, after more hours of searching on Etsy, I decided to give this pattern a try.

Source

I liked the look of Elysium's Underwear Style Training Pants and loved that it could be used to make regular panties later.  So I gave it a try.  It was so easy, which was great, since I needed to make twenty pairs.  I never had a chance to time how long it takes from start to finish (thank you my darlings), but they felt very speedy when I had a chance to work on them.  The directions are very easy to follow with lots of pictures.  I would say even a beginner at sewing could make these.  The only problem I had was knowing which size to do was really unclear.  I ended up making a test pair that I was pretty sure would fit at least one of the girls and then try it on them.  After that I had a much better idea of which sizes I needed.

For the most part I used what I had on hand to make them.  I used a bunch of old t-shirts and out grown/ holey/ stained baby sleepers.  For the soaker part, I used three layers of scrap cotton batting.  The only part I paid for  (besides the pattern) was elastic.  I did change one thing in the pattern which was that I changed the soaker part by adding a water proof section that I cut from an old jacket to help keep down messes.  In whole, this was a very inexpensive way to get a bunch of training pants.  


My opinion is that this is a great pattern and the girls love how they look.  The girls have worn them a little in a very casual go at potty training and they do help prevent big puddles on the floor.

Monday, September 10, 2012

Ice Cream Kit

Thanks to camp cancelling that last week, we got to go to a wedding!  So I needed to come up with a wedding gift.  A while ago, I came across this great link on Pinterest and knew that it would be so fun to make and give.
Family Bites
After buying a bunch of fun ice cream toppings and repackaging everything but the bottles, I arranged them in a basket with some crinkled shredded paper filler.  I repackaged the waffle cones in some clear plastic wrapping paper and tied them with baker's twine.  The candy and nuts I put in resealable sandwich bags and rolled down the tops and taped them.


I thought about taking the labels off the hot fudge and cherries and put new ones on them and everything else like in the original pin, but I got too lazy.  But I did print some great gift tags I also found on Pinterest.

Eat Drink Chic
After printing them, I trimmed them a little and then used a glue stick to glue them to the inside of a pretty blank card.  You could also print on the blank side of some pretty paper or glue on scrapbook paper.  Once dry, I cut them out and used a hole punch for where the twine would go.


 I also used the other half of the blank card to write a note to the happy couple, folded it in half, put two holes on the open side, and tied it closed with more twine (unfortunately I forgot to take a picture).  The last thing I did was wrap in more plastic and tied it closed with more twine.


Before making a bow I slide the tag on.


I think it turned out pretty cute.  Hopefully, the bride and groom agree.

Thursday, August 30, 2012

Shwin Designs Lucy Top

I was lucky enough to get to do some more pattern testing.  This time for Shwin Designs.  It is the Lucy Top.  A darling shirt that buttons by the shoulders and is reversible (yay, two shirts in one!).  The look reminds me a little of a pinafore dress on backwards.


I really wanted to use some great chambray or linen like she has pictured, but I didn't have any on hand so I used Blossom Savannah and Mamma Birds in Violet both by Valori Wells.


The top comes together very simply and quickly.  There are pictures every step of the way.  All in all, it was a great pattern.

Eleanor really loved it, especially since it has pockets.


If you head on over to her blog, she has some coupon codes up that are good till 9/6/2012.

(Sorry about the pictures.  I let Eleanor use my point and shoot camera and I didn't realize that she played with the settings till after I took all the pictures.)

Tuesday, August 21, 2012

Design Dreams

Nap Time Crafters is doing something very fun so I thought I would join in.  She is asking her readers to suggest what pattern she should design next.  I'm just starting to learn about designing my own items and have been wanting to figure out how to recreate this fantastic coat for the girls so here is my suggestion.

Isn't that the most adorable trench coat ever?

It has such great details and my favorite are the pleats.  Perfect for little dresses.

If I wasn't such a chicken I would figure it out myself, but hopefully it gets chosen!

Sunday, July 29, 2012

How to mend a knitted blanket - unconventional method

My youngest has a lovey that she refuses to sleep without.  It was the only blanket she would sleep with as a baby.  She is so possessive over it, she has fits if her sister even touches it.  It is almost impossible to even put it through the wash every now and then. When I saw a hole in her knitted blanket, our house went on Red Alert.  I was thinking "No!  I don't want to wean her off of that yet!  HELP!  What are we going to do?!"  It wasn't pretty.  


I called my mum and she didn't know what to do without looking at it and I'm hopeless with anything that involves yarn.  In desperation, I posted my plight on Facebook in hopes of some advice.  I got something, the mom of the friend who made the blanket saw it and asked Heather what to do and told me that I should take a yarn needle and sew the loose ends back together.  So I look at the hole.  All I see is a large spot and one tiny loose end.  I had no idea what I was supposed to do with the yarn needle.  I gave up.  Later, I was talking to my husband about the possible horror we were about to experience without it.  The brilliant guy he is suggested I put a patch on it.  In my head I was saying, but that isn't very pretty.  A light bulb moment...but a cute heart shaped one would be!  So that is what I did.

If you have a knitted or crocheted blanket that you desperately need mended and can't do a thing with yarn than this is for you.  

I simply cut out two hearts from some fuzzy pink fabric I had...

 zig-zagged around the edges...

 sandwiched the hole between the two hearts and sewed around the edges.  

Super easy and I think it turned out pretty cute.  Thank you, Michael, for the idea!  I'm sure by the time she gives this thing up it will have a few more.


(Sorry for the extra terrible pictures, I was trying to do it before Laurel noticed, so I was in a little bit of a hurry.)

Sunday, July 15, 2012

Thimble Berry Goodness!

As you know I live at a summer camp next to a lake.  Well, all around our house and the back acreage of camp has thimble berries.  Last year, I decided to try making jam with them and found out that we really liked it.  So I decided I'd do it again this year.  This morning we woke to buckets of water falling from the sky.  So there went my plan to pick them today.  Luckily, the sun came out in the late afternoon.  While my husband watched a movie with the girls, I went out and picked as many as I could find.  I wandered all over our backyard area and down the back dirt road.


(After a quick tick check, yuck!) I washed them all up in a vinegar wash (1 part vinegar to 10 parts water) to kill any possible mold, bugs, and disinfect, thus helping them to last longer.  Then I put them in a container and froze them till I feel I have enough berries and time to make jam.  

When I do go to make it, it is super easy.  Here's the recipe:

 Equal parts berries to sugar
Boil for 2 minutes.
Pour into jars and let it set up.

That's it.  Super easy.  Be sure not to boil too long, otherwise it becomes impossible to spread.

This fall, I want to pick huckleberries, since we have those too and make jam from those.  I hope to have enough for gifts at Christmas.  

I hope you enjoy all the great food nature has to offer this summer!